
Managing Journeys
Manage your pipeline with drag-and-drop stages, auto-enrolment rules, and automated workflows
Published
 Lakshey
Once your Journey is configured, the Board is where you'll spend most of your time. From here, you can add new records, move them between stages, search your pipeline, and automate how records progress through your workflow.
Understanding the Journey board
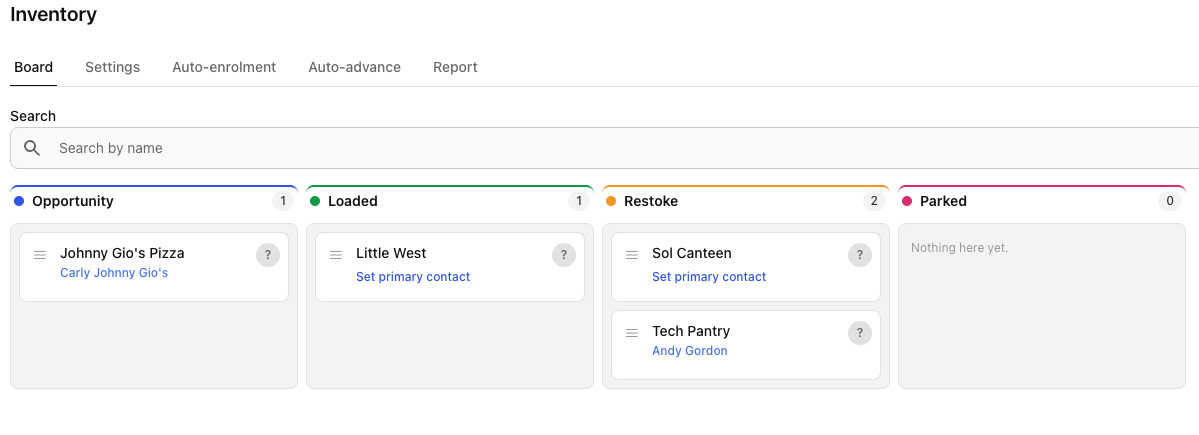
The Journey board displays each stage as a column, with every business or contact shown as a card within that stage.
Each card represents a run—a business or contact currently progressing through your workflow.
Depending on how you've configured your Journey, cards can display important information such as the owner, custom run properties, and other key details, allowing you to understand the status of each record without opening it.
Adding records
There are several ways records can enter a Journey.
Add manually
Click Add to journey to manually add an existing business or contact to the board.
You can also create a new business directly from the Journey by selecting Add business, making it easy to begin tracking new records without leaving the board.
Auto-enrolment
Journeys can automatically add records when they meet certain conditions.
From the Auto-enrolment tab, create rules that enrol businesses or contacts when they join a specific group.
You can also choose which stage they should enter, allowing different groups to begin at different points in your workflow.
For example:
New website enquiries could start in Target.
Qualified leads could begin in Meeting Booked.
Existing customers could enter an onboarding Journey at Training.
Once a record meets the rule, it's automatically added to the Journey.
Moving records through your Journey
As work progresses, records move from one stage to the next.
Simply drag a card into another column to update its stage.
This provides your team with an up-to-date view of where every business or contact sits within the process.
Completed stages remain visible for the number of days configured in your Journey settings before being automatically hidden from the board.
Search and filters
As your Journey grows, you can quickly find the records you need.
Use the search bar to locate a business or contact by name.
You can also filter the board by owner, making it easy to focus on work assigned to a particular team member.
Auto-advance
For workflows that don't require manual movement, Journeys can automatically progress records between stages.
Auto-advance rules use myne Automations to move businesses or contacts forward when they meet defined conditions.
For example, you might automatically move a customer from Training to Go Live once onboarding has been completed, or advance a sales opportunity after a proposal has been accepted.
This helps keep your Journey up to date while reducing manual work.
Managing your workflow
Journeys are designed to work alongside the rest of myne.
As records move through your workflow, you can:
Capture additional information using Run Properties.
Assign work to different team members.
Automatically enrol new records.
Automatically move records between stages.
Report on how your workflow is performing.
Over time, your Journey becomes a complete view of every business or contact moving through your process.
What's next?
Now that you know how to manage your Journey, learn how to use Journey Reports to measure pipeline performance, identify bottlenecks, and understand how records move through each stage.